PVE、OPNsense、Ubuntu Server设置小记
注意! 这篇文章仅仅是作为自己边鼓捣边摸索出来的产物,并非为一篇教程,并不能保证所有的内容全部正确,如有错误也欢迎指出。
目录:
安装 PVE
直接在官网上下载 ISO 镜像,然后按照提示安装上去就行。
安装中记得记录一下 Summary 与 Install Successful 中的信息,之后可能会用到。
首次安装完成后如果想要访问 ssh、WebGUI 等,需要先连接到安装时指定的管理网口(这里是 enp6s0),再设置电脑网卡将 IP 设置为安装时设置的同子网但是与 pve 主机不同的 IP。如果还是访问不了的话可以试试关闭其他网络连接(比如 WiFi 等)。
设置 PVE
设置硬件直通
由于想要将部分网卡直通给 OPNsense,所以要修改一下设置让 pve 支持硬件直通。
在 WebGUI 的 node 处登录 Shell,修改 grub 文件 /etc/default/grub:GRUB_CMDLINE_LINUX_DEFAULT=quite 一栏的值为 quite intel_iommu=on(AMD 的就是amd_iommu=on)。保存后使用 update-grub 更新。
修改 /etc/modules 文件,添加以下内容:
vfio
vfio_iommu_type1
vfio_pci
vfio_virqfd
保存后,重启机器。
运行以下命令行来列出所有 IOMMU 组:
#!/bin/bash
shopt -s nullglob
for g in `find /sys/kernel/iommu_groups/* -maxdepth 0 -type d | sort -V`; do
    echo "IOMMU Group ${g##*/}:"
    for d in $g/devices/*; do
        echo -e "\t$(lspci -nns ${d##*/})"
    done;
done;
硬件直通故障排除
由于我有一张无线网卡,想要直通到 OPNsense 所在的虚拟机中。而直接设置直通的话 qemu 会报错:failed to add PCI capability 0x11[0x70]@0x90: table & pba overlap, or they don't fit in BARs, or don't align。
这里就需要多做一步:修改 pve 的 /etc/pve/qemu-server/[虚拟机ID].conf,在文件一行加上:
# 这里无线网卡在虚拟机中分配到的是 hostpci4,按需修改
args: -set device.hostpci4.x-msix-relocation=bar2
更多信息可以参考:Failed to PCI passthrough SSD with SMI SM2262 controller. - Kernel.org Bugzilla、PCIe Passthrough of Atheros AR9280 - Promox Forums
安装和设置 OPNsense
安装 OPNsense
进入 pve WebGUI,上传 OPNsense 的 ISO 安装包。
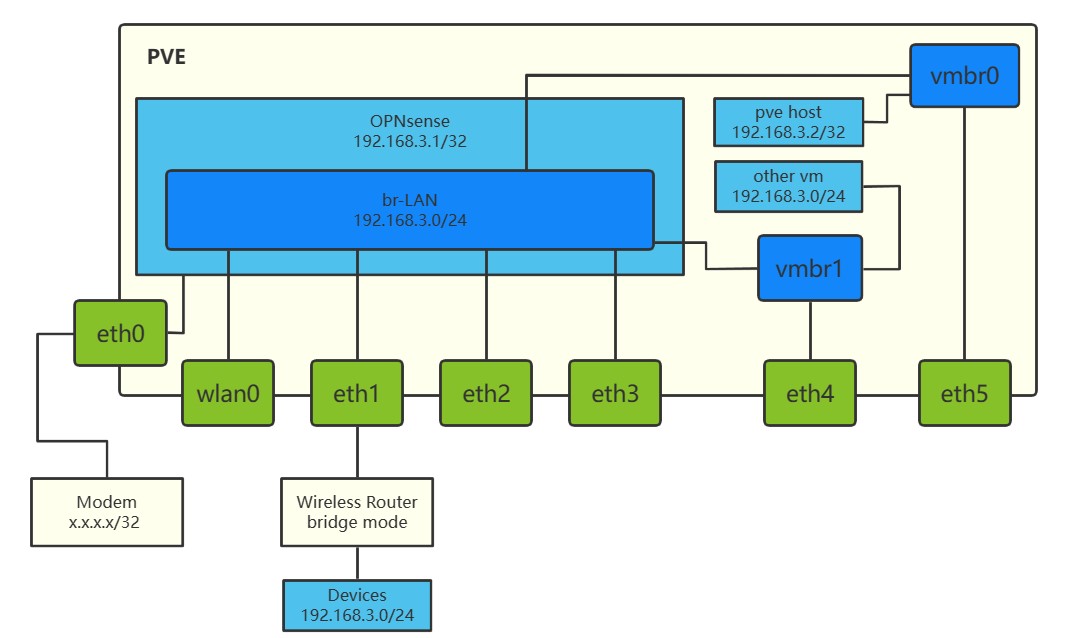
在 pve 节点处新建一个网卡桥接,选择一个与管理网卡不同的网卡,且只填写 Bridge Ports 字段。这里名字为 vmbr1。
新建一个虚拟机,设置参数(记得在 CPU 设置里把 aes 功能打开),添加网络设备 vmbr1 ,在 Hardware 里添加 PCI 设备,先只添加 enp1s0。
注意! 建议在新建虚拟机的时候先不要设置自动启动,以便如果出现了 OPNsense 配置错误导致的 pve WebGUI 访问不了,可以通过强制重启机器来恢复。等全部配置完成并确认没有问题后再设置 OPNsense 虚拟机自动启动。
启动虚拟机,首先进入的是 live mode(演示模式),其中在进入演示模式前会配置网络信息,这里建议手动配置设置好WAN口与LAN口,这里是把连接到光猫的 enp1s0 端口设置为 WAN,桥接网卡 vtnet0 设置为 LAN 口。
在成功进入演示模式后,使用用户名 installer 与密码 opnsense 登录,就能进入安装模式,完成接下来的安装,与设置管理员密码。
安装完成后,重启虚拟机,移除安装介质。
初步设置
将电脑连接到 enp5s0 对应的网口上,并将电脑的手动地址改回为 DHCP 自动获取地址。使用默认地址 192.168.1.1 登录上 OPNsense 的 WebGUI 后,完成初始设置向导。在设置向导里可以更改 LAN 口地址,防止与光猫的 192.168.1.1 冲突(建议与 pve 的子网相同,原因后面会提及)。应用设置后,等待一段时间(比较长),重新用新的地址访问 WebGUI 界面。
配置多网口
将网线重新插回 enp6s0 对应网口,重新设置电脑地址,将 OPNsense 虚拟机关闭,并添加 enp2s0、enp3s0、enp4s0 网卡。重新启动虚拟机。
按上面的方法回到 OPNsense 的 WebGUI。在 Interfaces ‣ Assignments 把刚刚添加的所有端口都新建一遍,保存设置。再在 Interfaces ‣ [刚刚添加的各网口],把刚刚添加的网口都启用,并应用更改。
在 Interfaces ‣ Other Types ‣ Bridge 里,新建一个 br-LAN 网桥,然后把除最开始添加的 LAN 口外的其他网口全部添加进去。回到 Interface ‣ Assignments,把 LAN 口(即在标识名字后面是 lan 字样的)换到 br-LAN,保存并应用。此时将断开与 OPNsense 的连接,将电脑连接到其他的 LAN 口上可以重新连接。
连接成功后,按照以上的操作方式把最开始的网口添加进 br-LAN ,保存并测试是否可以访问 OPNsense WebGUI。
在 System ‣ Settings ‣ Tunables 里,将 net.link.bridge.pfil_member 改为 0,net.link.bridge.pfil_bridge改为 1,修改防火墙行为。
配置 pve 可从内网访问
没找到什么其他的好办法。
目前的解决方法是将 OPNsense 与 pve 的 IP 范围设置为同一个子网(比如 192.168.3.x/24),然后将 pve 的管理端口所在的网桥 vmbr0 添加进 OPNsense VM,在 OPNsense 中将该网口启用并加入到 br-LAN 中。因为 OPNSesne 的 DHCP 服务器默认从 192.168.3.10/24 开始分配 IP 地址,所以给予 pve 静态 IP 地址 192.168.3.2/24。这样就能从内网通过访问 https://192.168.3.2:8006 来访问 pve WebGUI 了。
当 OPNsense 挂了后,就可以连接管理端口,手动配置 IP 地址在同一子网,来应急连接。
配置 AP
在 Interfaces ‣ Wireless 里创建一个无线网卡的克隆后,再到 Interfaces ‣ Assignments 里添加无线网卡的网口,保存应用。
添加网口成功后,在对应网口设置里启用,并设置以下内容:
| Setting | Value |
|---|---|
| Standard | 802.11na |
| Mode | Access Point |
| SSID | WiFi名字 |
| Allow intra-BSS communication | True |
| WPA | Enable WPA |
| WPA Pre-Shared Key/EAP Password | WiFi密码 |
| WPA Mode | WPA2 |
| WPA Key Management Mode | Pre-Shared Keys |
| WPA Pairwise | AES |
最后将该无线网口添加到 br-LAN 里就完成了。
配置透明代理
安装 Clash
首先开启 OPNsense 的 ssh 连接方式:在 System ‣ Settings ‣ Administration 里 Enable Secure Shell,并允许 root 登录与密码登录,保存并应用设置。
使用 ssh 登录 OPNsense,新建一个文件夹 /usr/local/clash,将 freebsd 版的二进制文件、配置文件、yacd面板文件都放进去。
使用 pw user add clash -c "Clash" -s /usr/sbin/nologin 创建一个无登录的账号,并给予文件所有者为刚刚创建的用户 clash:clash 。完成后就地运行一次进行初始化。
创建系统服务
新建文件 /usr/local/etc/rc.d/clash
#!/bin/sh
# $FreeBSD$

# PROVIDE: clash
# REQUIRE: LOGIN cleanvar
# KEYWORD: shutdown

# Add the following lines to /etc/rc.conf to enable clash:
# clash_enable (bool):  Set to "NO" by default.
#      Set to "YES" to enable clash.
# clash_config (path): Clash config dir.
#      Defaults to "/usr/local/etc/clash"


. /etc/rc.subr

name="clash"
rcvar=clash_enable


load_rc_config $name

: ${clash_enable:="NO"}
: ${clash_config="/usr/local/clash"}

command="/usr/local/clash/clash"
#pidfile="/var/run/clash.pid"
required_files="${clash_config}"
clash_group="clash"
clash_user="clash"

command_args="-d $clash_config"

run_rc_command "$1"
并给予运行权限 chmod +x /usr/local/etc/rc.d/clash
新建文件 /usr/local/opnsense/service/conf/actions.d/actions_clash.conf
[start]
command:/usr/local/etc/rc.d/clash onestart
type:script
message:starting clash

[stop]
command:/usr/local/etc/rc.d/clash stop
type:script
message:stoping clash

[status]
command:/usr/local/etc/rc.d/clash statusexit 0
type:script_output
message:get clash status

[restart]
command:/usr/local/etc/rc.d/clash onerestart
type:script
message:restarting clash
并启用 service configd restart
最后,前往 Services ‣ Monit ‣ Settings 里启用 Monit,并在 Service Test Settings 里添加两个:
| Setting | Value |
|---|---|
| Name | Clash |
| Condition | failed host 127.0.0.1 port 7890 type tcp |
| Action | Restart |
第二个,避免重启死循环
| Setting | Value |
|---|---|
| Name | RestartLimit4 |
| Condition | 5 restarts within 5 cycles |
| Action | Unmonitor |
在 Service Settings 里添加:
| Setting | Value |
|---|---|
| Name | Clash |
| Match | clash |
| Start | /usr/local/sbin/configctl clash start |
| Stop | /usr/local/sbin/configctl clash stop |
| Tests | Clash,RestartLimit4 |
最后等待一段时间,在 Monit ‣ Status 里查看是否运行。
配置透明代理
注意: 由于 Squid 被曝多个严重漏洞且维护团队人手不够,无法及时修复,OPNsense 维护团队计划将 Squid 的支持降为 Tier2。且该方法不支持代理 UDP/Quic 流量。故建议参考文章 在 OPNsense 上安装 tun2socks 服务 以使用新方法。
在 Services ‣ Web Proxy ‣ Administration 的 General Proxy Settings 里启用代理,在 Forward Proxy 里启用 Enable Transparent HTTP proxy、Enable SSL inspection、Log SNI information only,并点击每一栏 (i) 按钮中提示文字的 Add a new firewall rule(注意!添加完 NAT 项目后记得应用!)。
再前往 System ‣ Trust ‣ Authorities 处新建一个证书,使用下面的设置:
| Setting | Value |
|---|---|
| Descriptive name | OPNsense-SSL |
| Method | Create an internal Certificate Authority |
| Key length (bits) | 2048 |
| Digest Algorithm | SHA256 |
| Lifetime (days) | 356 |
| Country Code | NL (Netherlands) |
| State or Province | Zuid Holland |
| City | Middelharnis |
| Organization | OPNsense |
| Email Address | spam (at) opnsense.org |
| Common Name | opnsense-ssl-ca |
创建证书完成后,回到 Services ‣ Web Proxy ‣ Administration 的 Forward Proxy 里的 CA to use 选择刚刚创建的证书。
设置完成后先不设置上游代理,随便访问一下网页,然后在 Web Proxy ‣ Access Log 里看有没有访问日志。(提醒一点:如果半天发现没有反应,可能是 NAT 创建了项目但是没有应用)
最后,设置上游代理。在 Web Proxy ‣ General Proxy Settings ‣ Parent Proxy Settings 里,启用,并设置为 127.0.0.1:7890。
一个自动更新核心和配置文件的脚本
偷了一个小懒,请 ChatGPT (3.5) 帮我写了一个这个脚本 update.sh。只需要把这个脚本放置于任意位置,并配置好,就可以方便快捷更新核心和配置文件。
以下是这个脚本需要修改的地方:
current_directory为需要执行更新的文件夹,如果按照之前步骤操作则该部分不需要改动;download_config_url则为配置文件的下载地址,按需求更新;update_core_proxy和update_config_proxy分别是更新内核和配置时所用的 http/socks5 代理,为空则不使用;download_ui_url为下载ui.zip的链接,文件中的链接为 MetaCubeX/metacubexd 面板的下载链接。下载完成后需要自己解压ui.zip到相应目录。遵循update_core_proxy的设定;- 仓库信息部分分别为仓库拥有者
repo_owner,仓库名repo_name,文件中提供的是 Clash.Meta 的 Stable 版; repo_filename中<version>会替换为实时获取的最新版本。
#!/bin/sh

# 设置当前工作目录的变量
current_directory="/usr/local/clash"

# 定义下载config.yaml的链接
download_config_url="http://openmediavault:25500/getprofile?name=profiles/default.ini&token=xxx"

# 定义下载ui.zip的链接
download_ui_url="https://github.com/MetaCubeX/metacubexd/archive/refs/heads/gh-pages.zip"

# 定义Clash core GitHub仓库信息
repo_owner="MetaCubeX"
repo_name="Clash.Meta"
repo_filename="clash.meta-freebsd-amd64-<version>.gz"

# 添加代理变量
update_core_proxy="socks5://opnsense:7891"
update_config_proxy=""

# 定义当前所要执行的更新命令
current_command=$1

# 帮助文档函数
print_help() {
  echo "Usage: $0 [config|core|stop|help]"
  echo "Commands:"
  echo "  config   更新config.yaml文件"
  echo "  core     下载最新的clash可执行文件并替换"
  echo "  ui       下载最新的ui.zip文件"
  echo "  stop     停止clash进程"
  echo "  help     显示帮助文档"
}

# 备份并替换文件函数
backup_file() {
  if [ -f "$1" ]; then
    mv -f "$1" "$1.bak"
  fi
}

# 停止进程并设置权限
stop_and_cleanup() {
  echo "停止 Clash 进程:"
  chown -R clash:clash $current_directory
  /usr/local/sbin/configctl clash stop
}

# 定义信号处理函数
interrupt_handler() {
  echo "下载被中止。"

  # 根据当前执行的命令来选择是否替换文件
  if [ "$current_command" = "core" ]; then
    # 如果是下载 core,还原备份的clash(如果存在)
    if [ -f "$current_directory/clash.bak" ]; then
      cp -f "$current_directory/clash.bak" "$current_directory/clash"
      echo "已还原备份的Clash。"
    fi
  elif [ "$current_command" = "config" ]; then
    # 如果是下载 config,还原备份的config.yaml.bak(如果存在)
    if [ -f "$current_directory/config.yaml.bak" ]; then
      cp -f "$current_directory/config.yaml.bak" "$current_directory/config.yaml"
      echo "已还原备份的config.yaml.bak。"
    fi
  fi

  stop_and_cleanup
  exit 1
}

# 设置信号处理程序
trap interrupt_handler SIGINT

# 获取最新版本的clash可执行文件下载链接函数
get_core_latest_version() {
  local proxy_option="$1"  # 接受传入的core_proxy作为参数

  # 获取最新发布版本信息
  release_url="https://api.github.com/repos/$repo_owner/$repo_name/releases/latest"
  latest_release_info=$(curl $proxy_option -s "$release_url")

  # 从版本信息中提取最新版本号
  latest_version=$(echo "$latest_release_info" | grep -oE '"tag_name": "[^"]+"' | head -n 1 | cut -d '"' -f 4)

  # 返回最新版本号
  echo "$latest_version"
}

# 处理config命令
if [ "$current_command" = "config" ]; then
  # 备份并覆盖config.yaml.bak
  backup_file "$current_directory/config.yaml"

  # 设置代理,如果有的话
  config_proxy=""
  [ -n "$update_config_proxy" ] && config_proxy="-x $update_config_proxy"

  # 使用curl下载文件并重命名为config.yaml
  curl $config_proxy -# -fSL -o "$current_directory/config.yaml" "$download_config_url"
  download_result=$?  # 保存curl命令的退出码

  # 检查下载是否成功
  if [ $download_result -eq 0 ]; then
    echo "config.yaml 更新成功!"
  else
    echo "下载失败。请检查URL是否正确或网络连接是否正常。"
    # 如果下载失败,还原备份的config.yaml.bak(如果存在)
    if [ -f "$current_directory/config.yaml.bak" ]; then
      cp -f "$current_directory/config.yaml.bak" "$current_directory/config.yaml"
      echo "已还原备份的config.yaml.bak。"
    fi
  fi
  stop_and_cleanup

# 处理core命令
elif [ "$current_command" = "core" ]; then
  # 备份并替换clash文件
  backup_file "$current_directory/clash"

  # 设置代理,如果有的话
  core_proxy=""
  [ -n "$update_core_proxy" ] && core_proxy="-x $update_core_proxy"

  # 获取最新版本的clash可执行文件下载链接
  latest_version=$(get_core_latest_version "$core_proxy")
  # 更新 repo_filename,将 <version> 替换为实际的版本号
  repo_filename=$(echo "$repo_filename" | sed "s/<version>/$latest_version/")
  # 构建下载链接
  download_core_url="https://github.com/$repo_owner/$repo_name/releases/download/$latest_version/$repo_filename"
  echo "下载链接:$download_core_url"

  # 下载最新的clash可执行文件并解压
  curl $core_proxy -# -fSL "$download_core_url" | gunzip > "$current_directory/clash"
  download_result=$?  # 保存curl命令的退出码
  chmod +x "$current_directory/clash"

  # 检查是否更新成功
  if [ $download_result -eq 0 ]; then
    echo "Clash core 更新成功!"
    echo "最新版本:$latest_version"
  else
    echo "Clash 更新失败。"
    # 如果更新失败,还原备份的clash(如果存在)
    if [ -f "$current_directory/clash" ]; then
      cp -f "$current_directory/clash.bak" "$current_directory/clash"
      echo "已还原备份的clash。"
    fi
  fi
  stop_and_cleanup

# 处理ui命令
elif [ "$current_command" = "ui" ]; then
  # 备份并覆盖ui.zip.bak
  backup_file "$current_directory/ui.zip"

  # 设置代理,如果有的话
  ui_proxy=""
  [ -n "$update_core_proxy" ] && ui_proxy="-x $update_core_proxy"

  # 使用curl下载ui.zip文件到当前目录
  curl $ui_proxy -# -fSL -o "$current_directory/ui.zip" "$download_ui_url"
  download_result=$?  # 保存curl命令的退出码

  # 检查下载是否成功
  if [ $download_result -eq 0 ]; then
    echo "ui.zip 更新成功!请自行解压到指定文件夹中。"
  else
    echo "下载 ui.zip 失败。请检查URL是否正确或网络连接是否正常。"
    [ -f "$current_directory/ui.zip" ] && rm "$current_directory/ui.zip"  # 如果下载失败并且文件存在,则删除它
  fi

# 处理stop命令
elif [ "$current_command" = "stop" ]; then
  stop_and_cleanup

# 处理help命令或未知命令
else
  print_help
fi
(说实话在和 ChatGPT 协作这个脚本的时候,前期还没太复杂的情况下一切进展得非常顺利,也非常舒心。可等到需求越来越多,代码越来越复杂,ChatGPT 就开始犯各种各样的小问题,最后还是我自己完成了最后代码的修改和整合,可能是我用的模型不太强大吧,等一手某人让我白嫖一个 4.0 模型使用权(误))
设置网站绕过代理
有些服务很奇葩,即使在 Clash 规则里设置了直连,也不能用(说的就是你学习xx),估计是拥有某种方法检测透明代理。这里选择创建 NAT 规则将该域名绕过代理。
首先在 Firewall ‣ Aliases 里创建一个条目 NoRedirect1,类型选择 Hosts,内容为域名或 IP 地址,保存并应用。可以在 Firewall ‣ Diagnostics ‣ Aliases 里选择对应规则集查看域名是否成功解析为IP地址。
其次在 Firewall ‣ NAT 里,在透明代理那两个规则之前再创建一个规则:
| Setting | Value |
|---|---|
| No RDR (NOT) | True |
| Interface | LAN |
| Protocol | TCP/UDP |
| Source | LAN net |
| Source port range | any to any |
| Destination | NoRedirect1 |
| Destination port range | any to any |
设置仅指定设备通过代理
与上一步类似,在 Firewall ‣ Aliases 里创建一个条目 ProxyMAC1,类型选择 MAC address,内容为需要走代理设备的 MAC 地址(设备记得关闭随机 MAC 地址功能),保存并应用。
然后在前几步创建的两个 NAT 规则中,Source 条目从 LAN net 改为 ProxyMAC1,就可以保存应用了。
安装和设置 Ubuntu Server
没有什么特别的注意点,只是在新建虚拟机的时候选择 vmbr1 作为网络设备,就可以访问互联网。
设置安装有 OpenWRT 的路由器为纯 AP 模式
在 LuCI 的 Network ‣ Interfaces 里删除所有的 WAN 端口。
配置 LAN 端口:
General Settings:
| Setting | Value |
|---|---|
| Protocol | Static address |
| Device | br-lan |
| IPv4 address | 192.168.3.3/24 |
| IPv4 gateway | 192.168.3.1 |
Advanced Settings:
| Setting | Value |
|---|---|
| Use custom DNS servers | 192.168.3.1 |
| Delegate IPv6 prefixes | False |
Firewall Settings:
| Setting | Value |
|---|---|
| Create / Assign firewall-zone | unspecified |
DHCP Server:
| Setting | Value |
|---|---|
| Ignore interface | True |
然后把从软路由出来的网线插进无线路由器的 LAN 口就行。
最后常规设置配置 WiFi 就完成了。

